It is super easy to get excited about new music games, print & laminate away, then never use them because we don’t have a good system to organize music games.
I’m sure you’ve been there before.
You have a student frustrated with a music theory concept, and you know a music game will help … but you can’t find it easily?
Or maybe you know you have the perfect rhythm game … but you don’t remember what it’s called, who created it, or where you bought it.
Or you have spent hundreds of dollars on music games and never get around to printing and using them?
Organizing music games isn’t the most savvy of jobs, but it will save you time, frustration, and energy and will help you get back to making your music lessons unforgettably fun.
My goal today is to give you some solid ideas for organizing your digital and physical music game library so you will never be frustrated trying to find the perfect game for your teaching week–and so you will ultimately save money in the long run by using the games you have rather than purchasing and never using them.
Please note we use affiliate links in this post. As an Amazon Associate we earn from qualifying purchases. If you make a purchase through our links, it is no extra cost to you but gives us a small compensation.
Inspiration to Get You Started Organizing Music Games
In case you need some motivation to get you started with music game organization, here are some great quotes!
Organizing is what you do before you do something, so that when you do it, it is not all mixed up. – A. A. Milne
A good system shortens the road to the goal. – Orison Swett Marden
Organization isn’t about perfection; it’s about efficiency, reducing stress and clutter, saving time and money and improving your overall quality of life. – Christina Scalise
Doesn’t that inspire you to get started with taking that hard step?
I hope so, because I’ve got some great tips for you!
1) Don’t organize music games retroactively
Yes, the first tip is negative: don’t.
The organization bug can bite the best of us.
We decide to get organized, roll up our sleeves, spend hours in one folder… and give up because there are dozens of games or folders left that are even more cluttered than this one.
So when you start thinking about organizing your games, do not think backward.
Just move forward from today.
Today, you will start organizing your music games and will keep your games organized.
And once you get a good organizational system in place, then you can start retroactively organizing.
But only then.
And remember: that is completely optional.
2) Create one place for music games on your computer & in your studio
Let’s start with your computer, because that’s usually where music games begin.
If you do just one thing, this is it.
Go to your computer (after you’re finished reading this blog post, of course ;)), create a new folder, label it “Music Games.”
And only have one game folder.
I promise, it will make your life easier.
You can even stop here if you’d like and if you dump every music game you get into this one folder, you are at least this organized.
But if you still think that’s too cluttered, you’ll want to do step #3 too.
For your studio, you can apply this same principle.
Have one shelf, cubby, or location where you will store all your printable games.
If you have music games in more than one location, then what steps do you need to take to consolidate them today? (yes, today!)
3) Organize Music Games with Sub-Folders in your Computer
Again, I will start with computer files.
Once you have your initial music game folder, create sub-folders with the general theme or educational purpose of the game.
Some of the sub-folders we have for our teaching games are:
If you have various types of games from the broad categories, you can then create sub-sub folders, like this:
Rhythm games
Simple rhythm games
Compound rhythm games
Or, you can choose to organize them by levels
Rhythm Games
Beginning rhythm games
Elementary rhythm games
Intermediate rhythm games
Advanced rhythm games
This type of organization will help you nail down exactly what you are looking for when you need it.
It also is extremely helpful to let you know what gaps you need to fill (don’t have any chord games? Now you know to be on the lookout for those specific games).
You can do this similarly with printed games, which takes me to my next tip.
4) Organize Music Games Once they’re Printed
Organizing your games digitally is only half the battle.
What if you’ve printed dozens of games?
Where do you keep those so that you don’t lose important parts?
For your larger games that have a lot of pieces (or maybe paper dice you don’t want smashed), get a cheap plastic storage container to store them in
If you just have a few pieces that don’t need to get smashed (like our game tokens), you can put them in a small plastic container that will slip inside the sleeve of a page protector in your binder
Where to store these games once you have your system in place?
5) Create a Game Challenge and use your Music Games!
Now that you have taken the steps to organize music games, have some fun!
Music games will only benefit your students if you actually play them.
So if you’ve been collecting games and haven’t found the time to play them, start a game challenge this month.
Print one game and play it every day this week.
Get your students’ feedback. Do they love it? Think it’s lame? Want to play it every week?
Keep notes of their impression of the music games and you can start rating your games (your computer files and game binders can start having folders with “5-star games” or “2-star games” if you’d like).
How do you Organize Music Games? Share your thoughts!
Are you a natural at organization or does it suck the life out of you? Will you be trying one of our tips? If so, which one?
Comment and share!
It is proven that those who actually write down something will be far more likely to see it through.
So, if you comment that you’re going to create a general game folder on your computer, you’ll be one of the few who actually read this article and do it!
Raise your hand if you DIDN’T receive much, if any, instruction on music improvisation techniques as a student.
Mine is up!
Our teachers’ focus was on teaching us to read and interpret music, and while there is nothing wrong with that, there is a creative side to music that many of us missed out on, including improvisation.
I don’t know about you, but it’s easy for me to fall into the same pattern of focusing on music reading and interpretation without showing my students the joy of creating their own music.
I want my students to have all the musical skills that I wasn’t exposed to, so I’ve sought to grow in not only the skill of improvisation but also in teaching it.
Thankfully, there are a lot of ideas and resources out there to help us.
Before we get into teaching improvisation, let’s talk about what it is.
When we improvise, we make something up on the spot.
Maybe we improvise in the kitchen by using the ingredients we have on hand to create our own meal, or we improvise in a class when our technology has decided to mutiny by coming up with a similar activity or visual aid using whatever is in the classroom at the time.
In music, we improvise by using our knowledge of theory to create a song or piece in the moment.
Basic Music Improvisation Techniques to Try
Give this a try.
Sit at your piano and play the following chord progression with your left hand: C, Am, F, G (yes, this is the Heart and Soul progression, but it’s a great one!).
Once you’re comfortable playing and repeating this progression using blocked chords, try using a pattern to vary it, such as broken chords, Alberti bass, or a rhythmic pattern using the fifths of each chord.
Once you find a pattern you like, use your right hand to create a melody using simple rhythms over this chord progression.
You just created an awesome song!
And you can help your students do this too.
Helping Students with Music Improvisation Techniques
So how do we lead students in developing this skill of improvisation?
While it does take practice like anything else, there are some steps we can take to help our students through the process.
Start with the black keys.
I tell students that the black keys are like magic—you can’t play anything wrong when creating a black-key melody!
It’s even better when you accompany them, which can take a little practice, but once you’re comfortable on the black keys, you and your students can jam.
After students experience improvising on black keys, take them to the white keys.
Have them use a C major or A minor pentascale and improvise melodies while you accompany them.
To help them practice improvising at home, record and email audio recordings of accompaniments they can play along with.
If you’re not sure what to play, remember to pick some chords (4 chords work well), pick a pattern, and repeat the progression.
Your student will create the melody part.
As students learn I, V/V7, IV, and vi chords, they can begin accompanying themselves with their left hands playing the chords, blocked at first, and the right hand continuing to play melody as they’ve been doing.
Now they can make their own chord progressions.
From there, help them learn and add in patterns and eventually inversions for left hand.
As they learn new keys, have them improvise in those keys to help them master each one.
Make it part of their scale practice.
The ideas are endless.
Helping Students Who are Nervous about Trying Music Improvisation Techniques
Some of you might be thinking, “I’m uncomfortable with improvising and teaching it, and even if I get past that, how will I help students who feel the same way?”
It’s very possible to have students feel anxious or nervous about playing something without music in front of them.
When I began teaching students to improvise, I noticed that my new-to-piano students had no problems with it—it was fun!
My current students or transfer students were quite hesitant though.
To help them, I encouraged them that they couldn’t go wrong (especially on black keys), and even if they did, it’s part of learning how to improvise.
I also presented it as fun.
Try just doing a little improvising here and there to help them become more comfortable and confident while improvising.
Do the same for yourself; with practice, you’ll improve too.
Is it possible to gamify improvisation (since this is Music Game Club, after all)?
I think so!
Learning improvisation is all about parameters—play only on black keys, play only the notes of a C pentascale, use a certain chord progression or left-hand pattern, and so on.
Why not put these parameters on slips of paper and toss them in a hat for students to choose?
Or create a “story starter” for improvisation—pick a key, a left-hand pattern, and a picture to accompany?
As teachers, we can come up with a ton of creative ideas.
Even More Music Improvisation Materials
Finally, if you’re still looking for more ideas, support, and materials, there are a ton of resources out there. Here are just a few to get you started:
Trevor and Andrea Dow have a variety of free activities as well as books you can purchase that help students get comfortable with improvisation.
The activity above is just in time for St. Patrick’s Day.
Tim Topham has created a great resource for beginner piano lessons called No Book Beginners, which I highly recommend.
There are tons of great beginner-friendly improvisation activities throughout the plans, and you can get the first one free.
The TopMusic membership also has a bunch of courses, including a 4-chord composing course that you might be interested in for your students or even yourself.
The Fabers have a couple of improvisation books available if you’re looking for a hard-copy, bound book to use with your students. It has some fun theory work in there too.
I hope you’ve been able to gain some ideas to use in your studio to help your students do more improvising.
Have Music Improvisation Techniques to Share?
Do you already incorporate improvisation in your studio? How do you teach it and what resources do you like to use? Let us know below.
About Christina Hearn:
Christina Hearn is a private piano and voice teacher in Florida.
She has over 12 years’ experience teaching piano, voice, choir, and general music.
She loves being able to share her gift of music with her students and to continue to learn how to be a better musician and teacher.
She is very involved in her church’s music program and makes time to accompany other teachers’ students for recitals and competitions.
When she’s not working, you’ll find her reading, playing with her cat, or crocheting.
Teachers, before I give you ideas to teach music improvisation in your studio, I’d like to share a personal experience.
My piano journey began at the age of 7, where I mostly relied on sight-reading during lessons and even spent practice time sight-reading my older sibling’s piano books.
It wasn’t until I found a special teacher several years later who called me out on my shenanigans and challenged me to actually practice that I realized the importance of going deeper into music literature.
Now I was truly studying my repertoire, so that was great, but my terrible memory made performing a real challenge.
There were recitals where I just couldn’t get my music memorized, and I’d be the only kid up there with music in front of them. Over time, my reliance on sheet music became a significant limitation.
In college, I started to develop memory techniques, but I still felt terrified when asked to play off-the-cuff.
When I was student teaching in a choral classroom, I’d pray that no one had a birthday so I wouldn’t have to put the class through the pain that was me playing Happy Birthday by ear.
It wasn’t until I discovered the freedom and confidence to improvise, which happened while playing from chord charts in a worship band, that I began to improvise for pure enjoyment.
This newfound freedom led me to try composing my own music, which is now my primary source of satisfaction at the piano, surpassing even my love for sight-reading, haha!
So, teachers, I implore you to open up this world of improvisation for your students.
It’s not just about creating musicians who can play existing compositions flawlessly; it’s about nurturing their creativity, enabling them to find joy in musical exploration, and potentially uncovering a different type of artistry.
Let’s empower our students to experience the exhilarating journey of creation and unlock their full musical potential!
First let me mention these tips on improv that I’ve found helpful in my studio:
Don’t overthink the key. When improvising with students as I talk about in this article, I try not to overcomplicate the key. I like to simply identify which notes would be black in a given key/tonality.
Here is a short video of how my 10 year old student, Sofia, explained the key of A Major before we improvised at a lesson.
You’ll see how she knew exactly how to play in this key, but got bogged down when she decided to name the black notes.
Don’t worry about chord changes.
Also, I won’t be talking about chord changes in this 5 day improvisation curriculum.
I find that it is more freeing for my students to focus on the physicality of a given key or scale, and maybe even wander in and out of that, although often if I accompany my students I do give them the structure of changes.
No Blues.
Even though I teach my students blues scales and get them started with blues improv (and know that this is not my forte) the type of improvisation outlined in this article is much more about on-the-spot composing in any style, expressing ideas and fueling creativity.
Teach Music Improvisation for Every Day of the Week
Melody Monday This is a session that combines a brief experience of picking out tunes “by ear” then improvising in a similar style or key.
Alongside your student, pick out the important parts of a famous or chosen melody.
Keeping it simple, work together to find the notes. Imagine the first 9 pitches of Fur Elise, as an example.
(You can always Google lists like “Top 10 Christmas Songs,” “Greatest Classical Music Works” or “Billboard Hot 100” for inspiration.)
Don’t be afraid to make mistakes as you work together, because your student benefits from seeing this process.
Acknowledge/discuss as many additional concepts as is appropriate for the student’s level.
Position
Key
Major/Minor
Chords
Rhythm
Use the melody you’ve figured out as the starting point for a 5 minute improv. (I typically have students improvise just one hand at a time.)
Fur Elise is the A section, and your student improvises the B section
Theme and variation: Fur Elise could become unrecognizable after a few ideations
Oops, we forgot how the first 9 notes of Fur Elise go, and we have just morphed into using only our own creativity
We are getting comfortable with chords so we can use both hands and lay some interesting layers underneath Beethoven’s notes
Make-It-Your-Own Monday I love both of these, so Monday gets 2 ideas! This one is easy and accessible for all students as we take an existing piece and alter it.
Allow your student to choose a piece they’ve already been enjoying, maybe from their method or repertoire book.
Help your student change the title to mean something quite different
Ode to Joy becomes Ode to Bananas
Mr. Haydn’s Theme becomes Mr. Panda’s Theme
Whirling Leaves becomes Crunchy Leaves
New Irish Tune becomes New German Tune or Old Irish Tune
Talk about which musical qualities made the original title fit the piece (or vice versa)
Texture: thick, light, vertical, horizontal, dense, sparse, closed, open
Chords: analyze these with as much detail as is appropriate for your student
Dynamics
Color: I like to talk about bright and dark, and some students are able to relate sounds to more specific colors as well
What would you change to make the piece fit the new title?
Experiment/improvise a section of “your new piece”
Make up/change lyrics, if applicable
Guide your student as needed
Here is a video I created that will show you how to take a composed piece (selection from my book, Saga Land) and alter it to change the characteristics using some of the ideas from above.
Teamwork Tuesday
This is either a fun imitation session, or a question and answer improv, where the student and teacher work together by responding musically to each other.
(If you teach groups, the students can do it with just a steady beat from you!)
It can be adjusted to the level of your student by using options like these:
Elementary
Decide on a 5-finger position (I like to relate it to other pieces we’re learning)
Do a quick ear warm-up so your student relates the set of pitches to the context of the key they’ll be in
Play a simple pattern, using only steps and repeated notes, and help your student play it back without looking, then move on to including skips as possible (starting on pitch 1 or 5 is the easiest to hear)
Encourage your student to create a pattern for you to copy, and make mistakes so your student feels permission to do so as well
Take turns creating short musical questions, and the other plays an answer (always tying in to appropriate lessons for their level and providing a light steady beat)
Intermediate
Don’t tell your student what key you’ll be playing in, and begin a layer of chords.
Have your student experiment until they figure out the key and begin improvising in one hand
Accompany your student with basic chords as you each throw motifs into the mix
The ideas can be imitated, or questions and answers created for an organic and rewarding improv (such a useful skill to have!)
As you both play off of each other, often the improv will morph into something different, and if we’re listening we naturally end together also, which my students always feel so proud about
Wordy Wednesday This is one of my favorite ways to improvise and compose on-the-spot.
Use a sentence or phrase as the basis for a rhythmic and/or melodic motif.
Let your student come up with a sentence or set of words unknowingly
Pay close attention as your student talks about their day/week
Ask your student about the weather
Inquire about your student’s favorite sport or activity
Ask a pointed question like, “What’s your ultimate movie snack?”
Point out and simplify the phrase if needed
Repeat the phrase in a slightly exaggerated and rhythmic way with your student
Clap the rhythm with your student
Take the phrase’s rhythm and put it on one or 2 notes on the piano, then many notes (depending on the level of the student)
Have your student repeat the phrase in different ways and in different places on the piano (theme A)
Take a shortened version of theme A and make that theme B, then demonstrate how you can turn these 2 motifs into a whole section of music by playing them A, A, B.
Depending on what’s available to your student, you can:
Stop there
Play along
Have your student come up with accompaniment/chords/LH
Extend the phrase form with AAB/AAB/AAC
Try “coding” this in your student’s notebook or notate in some fashion
Sing along as if their sentence is the lyrics, and finish the song together
Thunderous Thursday
The weather makes for an easy improv session that can instantly be adjusted to the level of the student.
On Thunderous Thursday, use the howling wind, the hot sun, the morning dew, the gentle rain, the melting icicles or the lightning storm to inspire unique sounds at the piano.
Depending on their level, students can be supported as they:
Use the piano as a way to create sound effects: (I like to have students use their own creativity, as there is no wrong or right way to do this. But if you haven’t thought or taught this way before, or if your student needs more inspiration, these are some ideas)
Tapping or knocking on the fallboard
String strumming and/or prepared piano ideas like placing paper across the strings, if you have a grand piano
Low and loud sounds for thunder
Light and falling downward sounds for rain
Up and down or glissandos for wind (perfect visual and saves hands to have scarves around for this too)
Heavy and full multi-note sounds for sun
Sneaky light single-note sounds for drips
Light sounds with lots of pedal for fog
Share weather-related paintings or photos from google to help out with the visuals, like these:
Some students may struggle translating weather sounds into music, so starting by translating them into sound words might help (remember onomatopoeia?)
Boom, crash, bang
Drip, drip, splash
Pitter-patter
Woohoo, whoosh
Crack, whack, gong
Fearless Friday Throw the rules straight into the recycling bin and let the freedom of fearless improv be the wind in your hair! Make bold, fortissimo “mistakes.”
Create unabashed soundscapes.
Don’t edit yourself!
If students need a little push, try some of these tools:
Paint sample color deck. I punch holes in mine and keep them on a metal ring. We use both the colors and the color names to inspire our improvising.
Composition idea cards like Composition Story Prompts (left top) from Rainbow Forecast. I like to turn them upside down and have students choose 3. We either improvise in separate moments based on our cards, do AB and C sections of the same improv, or combine and overlap the ideas, depending on the student.
Paintings are great visual inspiration (google images work well)
Regular note name practice flash cards, chosen at random, to determine pentascale, scale, key, combination of notes, etc.
Decide Now spinner app pre-loaded with any choices you can think of, like these:
Key names
Moods: sad, happy, nervous, excited, sleepy, calm, angry
Styles: choppy, smooth, short, bouncy
Animals
Various nature themes: still lake, rushing river, high mountain, dark woods
Colors
Students have their own endless supply of ideas, very often!
If this is your first time trying improvisation with your students, I hope you find this little guide helpful.
Of course, you can use these ideas any day of the week, with any level of student.
Some students love improv so much, they ask if we can do it at every lesson, which I’ll try to do!
Other students resist it at first but they warm up to it over time.
I like to do a quick improv at least once a month.
Aside from the obvious theory learning that’s happening, it grows ears, builds creativity, enhances spontaneity, and boosts confidence.
Do you have fun ways to teach music improvisation?
I’d love to hear from you if you have questions or your own ideas to share!
Extra resource: https://forrestkinney.com/improvising-1
I adore the Create First! Duet 1 Book, which provides ideas for student improv that include a teacher accompaniment.
About Elizabeth Swift:
Ms. Swift began teaching piano to neighbors when she was just 13, and has been teaching ever since!
She taught secondary pianists at the University of Cincinnati-College Conservatory of Music while she double-majored in Piano Performance and Music Education, and soon started working in a local piano studio.
Before she graduated with her degree Elizabeth started her own private piano studio at a local church, meanwhile, training to teach in the classroom with an emphasis on choral music and general music education, grades K-12.
She also started a Kindermusik program for children as young as 18 months.
Ms. Swift currently runs a diverse private piano studio in greater Cincinnati, Ohio, serving and learning together with a wonderful group of preschoolers to adults.
She incorporates all styles of music in her teaching and includes composition, improvisation, and other forms of confidence-boosting creativity and self-expression through the piano.
After spending nearly a lifetime reading, teaching, and performing other people’s works, Elizabeth’s love for improvising and composing emerged rather late in the game.
In 2013 she offered to play keyboard on her church’s worship team, and before long she had made the transition from struggling through the chord chart format, to improvising as a satisfying and rewarding endeavor.
Since then she has realized her passion in improvising/composing/creating music that helps students connect to their instrument and their own passion with repertoire that is meaningful to them.
Although Ms. Swift’s favorite and beloved inspirations are her own piano students, she is often inspired by nature, travel, art, and poetry.
Elizabeth is actively involved in her local music teaching organizations, currently serving on the leadership boards of both KTA (Keyboard Teachers Association) and OMTA-SW Ohio Music Teachers Association-Southwest).
She is a Nationally Certified Teacher of Music (NCTM) through MTNA (Music Teachers National Association) and a member of both ASCAP (American Society of Composers, Authors and Publishers) and NLAPW (National League of American Pen Women).
In her free time, you can find Elizabeth traveling, hiking, or hanging out in a hammock along with her husband, 4 children, and their two Australian Shepherds.
After a few years of teaching, you might start looking for ideas to use music note flashcards for more than note drills.
While note drills have their place (and I have done many 1-minute challenges in my studio!), there are so many fun things you can do with one-note music note flashcards.
Here are four fun ideas to shake up your music note flashcards in the studio!
1. Teach Lines & Spaces with Music Note Flashcards
Let’s start with your beginning students.
It’s tempting to wait and use music note flashcards for when students know their note names, but you can use them way before then!
Start by introducing your students to lines and spaces.
Here are 2 fun games to teach lines & spaces with music note flashcards
First, be sure to only use notes that are on the lines and spaces (e.g. no Middle C).
It’s war! Give each student a die. Flip up a card and students race to roll the correct number on the die (e.g. Line 1 = 1; Space 3 = 3). The first student with the correct number collects the card. Student with the most cards at the end wins.
Each student has a die. The cards are at the center. Each student picks a card and has to roll their die to match the number. As soon as they do, they can pick another card from the center. Student with the most cards at the end wins.
2. Use Music Note Flashcards for Sight Reading
This is going beyond note drills with flashcards.
Bring the music note flashcards to the piano and have students actually read the cards they’re reviewing.
Here are four sight-reading ideas you can use:
Lay out 5 cards. Teacher says a note name (“treble clef G”) and the student has to find it. If you’re playing in a group, the first student to slap the correct note gets to keep the card. The student with the most cards at the end wins.
Lay 3 cards on the piano and play 1 of them. The student has to identify the exact note played (this is a great idea for having all 3 Cs on the piano and they have to decide if you played low, middle, or high).
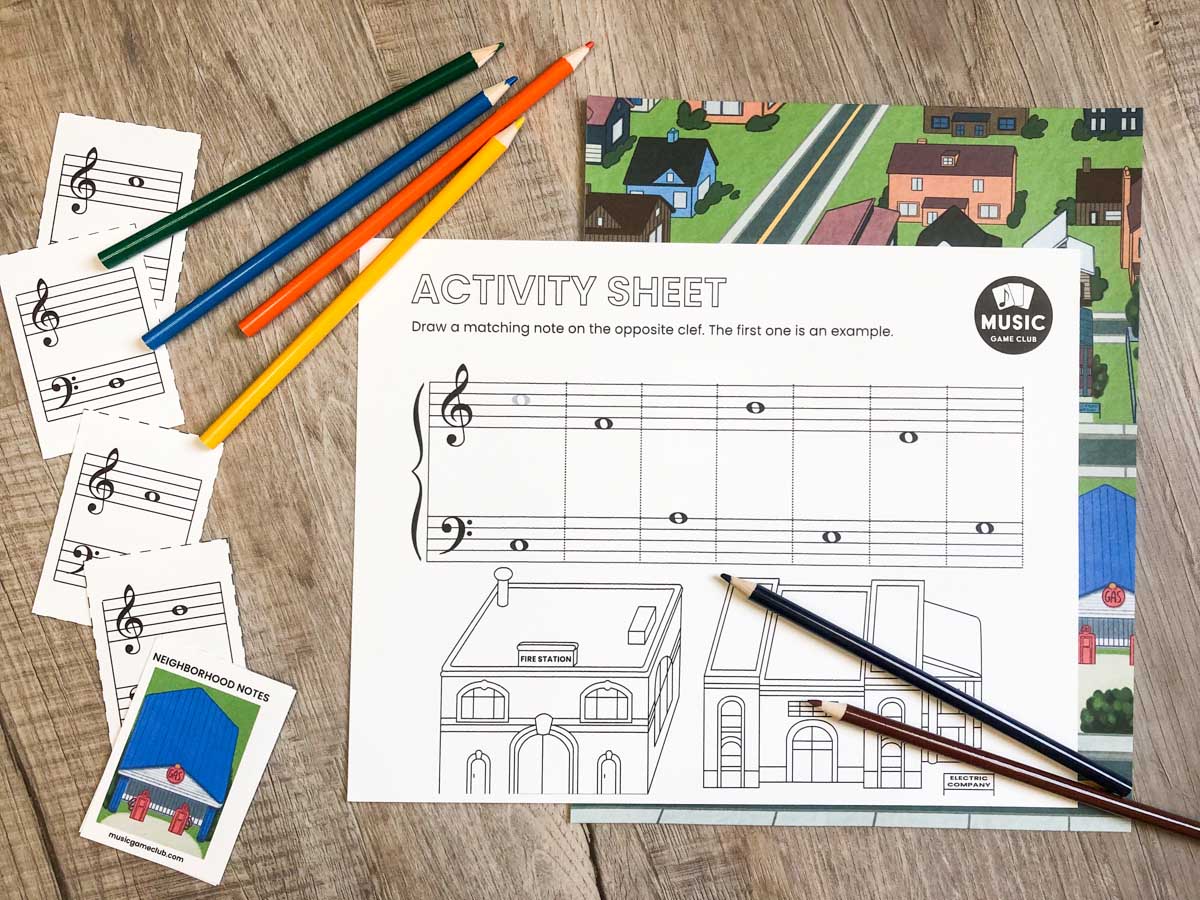
Lay 5 cards on the keyboard and have the student sightread through them. For fun, put the Neighborhood Notes buildings in a cup and have them draw 1 building when they’ve correctly sight-read 5 notes. After 3 rounds, how many points do they have?
For a group: show students 1 card. They must race to play the exact pitch on the piano!
3. Ear Training with Music Note Flashcards
While our students need a lot of help with recognizing notes on the staff, it’s also important to train their ear (in my opinion, ear training helps sight reading!).
Here are 3 easy ways you can use music note flashcards for ear training.
Line up 3 cards on the piano (I’d just do 1 clef). Play the C scale and then play 1 of the cards you have flipped up. The student has to guess which note it is without looking.
Flip 3 cards up (both clefs). Play all 3 notes while the student calls out their name. Ask the student to turn around. Play just 1 of the notes. What note is it? (to make this easier, do notes that are really spread apart)
Line up all 8 cards for the C scale. Play the scale then play just 1 note. The student has to guess which note it is. For added fun, have the student collect Neighborhood Notes buildings when they guess a note correctly (A = Academy, etc.)
4. Play Neighborhood Notes!
You may have been wondering what Neighborhood Notes is that I’ve been mentioning.
Well, it’s our newest music notes flashcard game!
Neighborhood Notes takes a twist on the card game “Spoons” and is a speed note reading game.
You can play it with 2-8 players and keep track of points (which are tricky–there are some negative points on the board!)
Watch how to play it in our tutorial video.
Here’s what you’ll get with the Neighborhood Notes printable download:
Neighborhood Notes game in 2 sizes: US letter & A4
Neighborhood Notes game board (bonus: in poster and A3 sizes)
32 note cards (C3-C5)
7 building game pieces
Neighborhood Notes success poster
Neighborhood Notes activity sheets in 2 sizes: US Letter & A4
Print release
Bonus: Note Chart
Neighborhood Notes was our April 2024 Music Game Club membership game.
But there’s more!
Digital Music Note Flashcards
If your students always forget to review printed music note flashcards, then it’s time to try digital games!
Comment and share YOUR best tips, games, or even just fun memories about using music note flashcards in your studio! We love hearing from other teachers!
Sometimes, you just need a handful of music game ideas to keep your students enjoying learning.
Today’s blog post will be slightly different, because I want to dive into the many ways you can use Magpie Melodies to teach scale degrees, composing, sight-reading, and rhythm.
1. Teach Scale Degrees
I don’t know about you, but I graduated before I learned what scale degrees were.
I know there is some debate whether or not it’s important to teach students tonic, super-tonic, mediant, etc. but what we can all agree on is that knowing scale degrees is important (whether you call them by name or numeral).
Magpie Melodies’ original gameplay will help you teach students tonic, mediant, and dominant in C Major.
To reiterate these terms, the students move forward according to the scale degree (tonic = 1 point, mediant = 3 points, dominant = 5 points).
I have one composing student, and we are constantly discussing the importance of choice in music.
When it comes to composing, there aren’t hard-cut “right and wrong” choices.
There are just choices.
And Magpie Melodies gives a solid foundation to fuel this discussion with your students.
As the student is building their melody, start analyzing how the melody is moving and if it would sound better if you swapped two measures.
Play through the eight measures, swap around a few measures and play it again and see which one sounds more tasteful.
If you’re ready for even more discussion, introduce question & answer, sequences, and repeated phrases.
3. Short Sight-Reading Practice Music Game Idea
Sight-reading is a learned skill, and sometimes students really struggle with it.
So using short sight-reading excerpts is a great way to introduce them to sight-reading or to help them if they struggle with pairing accurate notes and rhythms.
When you play Magpie Melodies, have the student sight-read their card before moving forward.
You can even adapt the rules some and have them move forward 1 point per correct note and 1 point per correct rhythm!
4. Melody Mystery Sight-Reading Music Game Idea
Who doesn’t love a good mystery puzzle?
Magpie Melodies has 8 tunes and each tune is color-coded!
This means that you can give a student all of one-color melody cards and they have a complete tune in their hands.
This is a great way to encourage sight-reading as the student pieces together measures 1-8.
Have the student sight-sing or sight-read each card to figure out what goes first, second, etc.
5. Help Students with Rhythm
The cards in Magpie Melodies range from basic rhythm (quarter notes, quarter and half notes) to slightly more complex rhythms (dotted quarter notes, eighth notes).
This provides you ample opportunity to use them to teach rhythm to your students.
You can flip up two cards and clap & count one for the student to guess.
Or, have the student clap & count the card before they move on the game board.
6. Rhythm Matching Music Game Idea
Make a matching game where you match rhythms only by laying out a 3×3 grid of cards.
Match all of the visible identical rhythms (this will help the student observe matching rhythms even if notes differ) and replace the cards with new ones.
Sometimes, there can be 3-5 of the same rhythm flipped up!
Whoever has the most cards at the end wins.
7. Ear Training Music Game Ideas
Help your student with ear training by picking 3 cards from Magpie Melodies.
Play just 1 card and have your student choose which card you played.
If I were playing this version, I would start super easy with different rhythms as well as pitches.
But as the student gains confidence, I would start picking cards that look very similar (same rhythms, pitches vary only slightly).
Bonus: Music Game Ideas for Group Music Lessons
Magpie Melodies makes a great group music game.
Any of the music game ideas I discussed above can be easily adapted to up to 8 players.
You can print our bonus poster-sized game board so students can easily see what’s going on with the game board.
About Magpie Melodies Music Theory Game
The 64 melody cards come from 8 real tunes kids will recognize:
Mary Had a Little Lamb
Ode to Joy
London Bridge
Are You Sleeping?
Bridal Chorus
Hot Cross Buns
Row, Row, Row Your Boat
Rain, Rain Go Away
Each melody card has just one measure from each tune.
Students will draw cards and create their own, unique 8-measure melodies while identifying the tonic, mediant, and dominant pitches.
Upper level students can rearrange their cards to be more strategic with their composition while younger students can put cards in the order they picked them.
Here’s what you’ll get with the Magpie Melodies printable download:
Magpie Melodies game in 2 sizes: US letter & A4
Magpie Melodies game board
64 melody cards (color coded per song)
8 magpie game pieces
Guide card for tonic, mediant, and dominant in C major
Magpie Melodies success poster
Magpie Melodies activity sheets in 2 sizes: US Letter & A4
While you can teach minor scales by rote or handing a written scale to your students, I have found the best way to teach minor scales is by helping students understand them.
If I haven’t mentioned it before, I’m an ear player.
Thanks to my mom (my main childhood teacher) who did not play by ear, I am a very strong note reader.
But there were many ways I slipped into relying on my ear rather than reading.
And minor scales was one of those.
Once I heard a minor scale, I fiddled around until I figured out minor scales in other keys.
And did a LOT of messing up.
You probably have students like me.
It wasn’t until I was in my teens and actually tried to understand minor scales that I was able to more accurately play all three minor scale forms.
Understanding how the natural minor, harmonic minor, and melodic minor scale steps differed worked wonders in my minor scale playing!
Here are three different methods you can use to teach minor scales to your students.
1. Teach Minor Scales Based on Steps/Pattern
As a teen, I was good at memorizing patterns, so I latched onto the minor scale steps.
Here are the patterns in whole steps (W) and half steps (H):
Natural Minor Pattern
The same ascending & descending
Ascending W‑H‑W‑W‑H‑W‑W
Descending W-W-H-W-W-H-W
Harmonic Minor Pattern
The same ascending & descending
Ascending W‑H‑W‑W‑H‑3H‑H
Descending H-3H-H-W-W-H-W
Melodic Minor Pattern
Different ascending & descending (descending is Natural Minor)
Ascending W‑H‑W‑W‑W‑W‑H
Descending W‑W‑H‑W‑W‑H‑W
And here they are if you use tones (T) and semitones (S):
Natural Minor Pattern
The same ascending & descending
Ascending T‑S‑T‑T‑S‑T‑T
Descending T-T-S-T-T-S-T
Harmonic Minor Pattern
The same ascending & descending
Ascending T‑S‑T‑T‑S‑3S‑S
Descending S-3S-S-T-T-S-T
Melodic Minor Pattern
Different ascending & descending (descending is Natural Minor)
Ascending T‑S‑T‑T‑T‑T‑S
Descending T‑T‑S‑T‑T‑S‑T
Once you teach minor scale patterns, your student can start on any pitch and figure out the minor scale by following the pattern.
In addition to the Mythical Minors printable game, we have launched 8 Minor Scales Boom™ Cards (digital music theory games) that you can get to review minor scales in different ways.
See a preview in this video (don’t see the video, watch it here).


 Ms. Swift began teaching piano to neighbors when she was just 13, and has been teaching ever since!